

The first thing that customers look at the moment they enter a restaurant is the menu. Some establishments have waiters bringing printed menus to the diner’s table, while others are taking advantage of technology and flashing their products on a large display right above the ordering counter.
The latter has seen wide-scale use in dining establishments, accounting for 20% of the whole digital signage industry. This is owing to its effectiveness in improving customer experiences and generating sales, with statistics showing that digital signs contribute a 3% increase in profit margin per transaction.
Digital signage software present vast opportunities for restaurants, allowing them to display their products in an appealing way that can’t be missed. Digital signage also helps restaurants:
- Save money on printing costs
- Streamline their ordering process
- Revolutionize the customer experience in their establishment
What is a Digital Signage Menu Board?
A digital signage menu board is a large display showcasing a restaurant’s offerings in an engaging manner, similar to how Warehouse digital signage can display real-time inventory updates and task lists in industrial settings. It features images, videos, or other forms of media along with relevant information to facilitate a customer’s purchasing decisions.
A digital menu board primarily streamlines the ordering experience by providing everything the customer needs at a glance. Immediately when they enter the establishment, they are greeted by an attractive screen that tells them what they can order, how much it will cost them, any special offers they can avail of, and more.
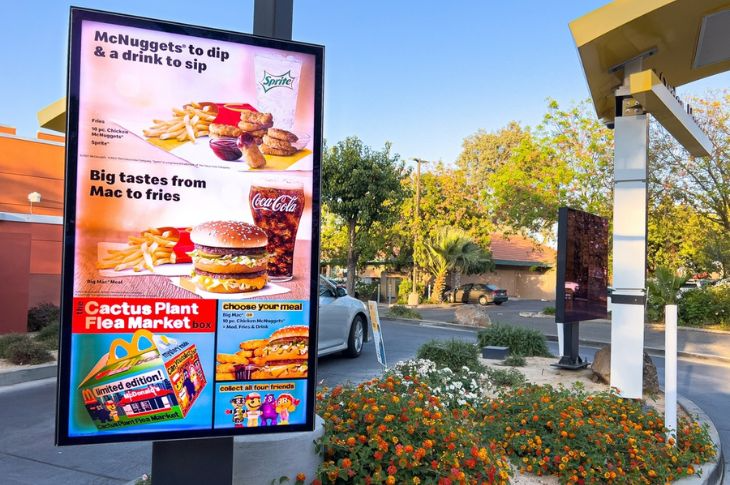
You’ll often see menu boards like this in large fast-food franchises like McDonald’s, with some even going as far as making the digital menu interactive — thereby allowing customers to order and pay by interacting with the screen.
3 Benefits of Having a Digital Signage Menu Board
Digital signage menu boards are becoming a standard in the restaurant industry — and for good reason. They display a restaurant’s menu in an attractive and engaging way, helping them inform customers of their products while improving their dining and ordering experience.
1. Easy Updating
Before the adoption of digital signage menu boards, restaurants needed to print out a handful of menus and serve them at every table. While there’s nothing particularly wrong with that, it does come with limitations, especially when the restaurant scales its offerings or a specific item becomes unavailable.
Printed menus will need to be overhauled and reprinted in case of changes, and especially for an establishment that scales at a fast pace, the costs can add up over time. Digital signage helps solve this problem by allowing you to change and update content in real-time. It only takes a couple of clicks to deploy fresh content, and with good software, you can even do so remotely.
This helps keep restaurants competitive. With digital signage menu boards, they can show timely content at different hours of the day (i.e. a breakfast menu every morning or an alcohol menu at night), update their menu to highlight new additions or seasonal meal options, and quickly announce new prices or running promos.
2. Improve Customer Experience

If there’s one thing that irks customers the most when dining out, it’s waiting — whether to be given a menu, to be assisted by staff to shed light on the best-sellers, or to stand in line until it’s their turn to order.
Digital signage can help restaurants with queue management. It gives customers the information they need as soon as they walk in and enables them to peruse the menu and make a decision while in line.
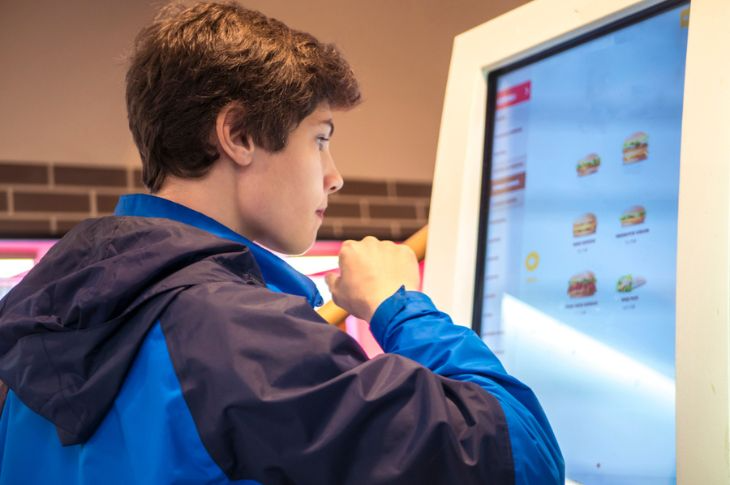
There are also interactive menu boards that can help customers carry out the whole ordering process, from picking their meals to paying for their order, without ever approaching the counter. Installations like this streamline the dining process and reduce customer wait times.
Further, digital menu boards don’t have to be limited to displaying menus and food. Restaurants can incorporate more widgets or content types to cater to waiting customers and keep them busy. From a social media dashboard and news reports to ad videos, they can leverage dynamic and engaging displays to enhance the customer experience.
3. Menu Automation
One of the functions of a digital menu board is to allow your customer to navigate the menu and get the information they need without relying on the staff. This becomes especially beneficial in busy hours when all your waiters are occupied.
Digital menus can facilitate self-service, allowing diners to pave their own journey. Tied with a point of sale (POS) software, you can program your menu board to upsell products based on buyer behavior, such as recommending that they size up or promoting a new side dish.
Digital menu boards can also go as far as to provide information about ingredients, calories, and diet suitability — all so they don’t have to ask the staff and hold up the queue.
What You Need to Make a Digital Menu Board
If you’re ready to level up your restaurant strategy and switch from printed menus to a digital menu board, here’s what you’ll need to get started:
- Your menu and information about your best sellers, promos and seasonal offers, etc.
- A computer, laptop, or media player to manage your content
- Your brand collaterals and photos of your food
- Your digital menu board screen. There are screens that are designed specifically for digital menu boards. But if you don’t have the budget or aren’t ready to invest just yet, you can repurpose a smart TV.
Steps to Make a Digital Menu Board
Now you can get started creating your digital menu board. Don’t worry, the process isn’t nearly as difficult as it sounds. To guide you through it, here’s a step-by-step guide to setting up your digital display.
Step 1: Sign Up for a Digital Signage Software
Digital signage software is what’s going to help you manage your display. Through it, you can schedule content, create content playlists, add widgets, and overall optimize what’s going to show up on your screens. As such, you need to find software that’s going to cater to and support your needs.
Before you sign up for one, make sure it has the following features:
- Content scheduling - helps you plan your content.
- Third-party integrations - allow you to integrate your software into existing tools.
- Multiple layouts - enables you to display content in different screen layouts and sizes.
- Content format support - should be able to play a range of media formats and support live streaming and RSS feeds, among others.
- Hardware compatibility - ensures the software works with any existing hardware systems.
- Multi-user access - allows you and your team to access the software and manage content.
Rise Vision is a cloud digital signage software that’s compatible with any media player or hardware system. Our solution allows you to maximize your digital menu boards with hundreds of customizable templates, easy-to-use features, free training, and fast support.
Step 2: Create Content

Businesses find that the most challenging part of incorporating digital signage is to come up with the content itself. Especially if you don’t have an artistic flair, you might be worried about how you will design your display to make it as effective and eye-catching as possible.
The good news is that you can make stunning content for your menu board in several ways:
- Use pre-made templates
- Work with a content team
- Leverage content creation tools
Using Templates
Your software will come with templates that you can choose from and utilize to get started. Rise Vision has a range of customizable templates for your menu, from lunch menus to menu boards with QR codes.
If you don’t find a template that suits your branding or vision, don’t fret! You can always customize it and change the design, content, and colors. It’s highly encouraged to play around with your template until you develop a design that aligns with your business.
Your template can serve as your starting point for creating a digital menu board that reflects your brand and displays your products in their best light.
Using a Content Team
You don’t have to use a template — although they are available for you to easily create and deploy content when you need them. If you have a design team who can help you create content from scratch, then by all means, utilize them.
Having a graphic designer and copywriter, among others, might be a good investment for your digital menu board, especially if you foresee the need to change your content and its design as your business scales.
Using Online Tools
There is also a range of tools available online that you can use yourself to make eye-catching menu board content. These will usually come with a suite of features that can facilitate your content creation process, from multiple fonts and colors to layouts and effects.
Here are some of the best content creation tools you can explore:
- Apple Keynote - Apple Keynote is a highly versatile design tool offering more than just templates and your usual customizability features. It takes it a step further with animations, slide transitions, and handwriting-to-text capabilities.
- Canva - Canva is a powerhouse for creating designs for varying applications. It boasts creative templates, photos, and videos, plus plenty of features that enable you to create designs from scratch.
- DSMenu - Made specifically for designing digital menu board content, this tool has a range of templates, logo creation features, and industry-standard designs fit for all restaurants and food businesses.
- Easil - Graphic design software Easil has an incredibly user-friendly interface that allows you to create digital menu board content of different dimensions. It also features templates that are minimalist yet aesthetic.
- Google Slides - While Google Slides isn’t tailor-made for digital menu board content creation, it does have plenty of design tools up its sleeve that make it very useful for this purpose. This application is most suitable for those who want to make content from scratch, as well as collaborate with other team members to edit designs and manage slides.
- Microsoft Powerpoint - An alternative to Google Slides, the classic Microsoft PowerPoint also offers useful features for content creation. Its main selling point is its new intelligent design suggestions that provide inspiration for customizing a digital menu board.
Step 3: Set Up Your Digital Signage Screen
Now it’s time to show your content on your digital signage screen. You have quite a handful of options for content deployment.
Using a Smart TV
If you are using a TV for your digital signage, getting your content to show up on the screen should be relatively easy. You can go the old-school route, plugging in a USB and setting up the display.
If you’re using other hardware for your digital signage software, like a laptop or computer, you can also use an HDMI adaptor to connect the hardware to your screen and display your content.
Some TVs have programs that can deploy your content without the need for extra wiring. Samsung’s Smart Hub, for example, uses the SmarterSign Digital Signage Player App for this.
Using a Web Player
If your TV or steaming hardware supports it, you can also use a web player to display content. These are built-in web browsers that allow users to display a web page on the screen.
Using a Digital Signage Player
Using a digital signage media player is the most seamless way to deploy your content on your screen. Depending on the model you purchase, you can enjoy features like higher-resolution displays, offline playback, more storage space, and multi-screen support.
There are media players made specifically for digital signage applications. But you can also go for today’s most popular options, such as:
- Rise Vision Media Player Hardware as a Service - Made specifically for digital signage and completely managed by Rise Vision.
- Fire OS - Easy to set up and use; broadcasts content over Wi-Fi. It’s also a cheaper alternative to other players.
- Raspberry Pi - Low-cost, adaptable, and durable.
- Chrome OS - Familiar interface and secure operating system.
- Windows - Several types of media players, including sticks, boxes, miniature players, and enterprise players. These are best for more complex digital signage systems.
- Android - Easy to use, affordable, and well-supported.
- Ubuntu - Contains features that maximize digital signage, however, this system requires IT know-how to use.
Instead of purchasing your digital signage software and hardware separately, Rise Vision offers an all-in-one subscription that comes with a display and built-in media player.
Reduce your hardware costs and simplify your digital signage procurement with our Avocor R Series Hardware as a Service. With all the hardware you need to start communicating your message and complete management and support from Rise Vision, you get more value out of your investment.
We also have the Rise Vision Media Player Hardware as a Service, a subscription media player you can easily plug into your display, internet, and Rise Vision software and deploy your message. Also a white-glove service, we’ll handle all the technical tasks involved in digital signage so you can focus on your message.
Design Tips for Digital Menu Boards
To fully take advantage of your digital menu board, you need to keep the following best practices in mind. These will help you create stunning and effective content that will reap all the benefits of your investment.
Follow a Grid System
Your digital menu board should be organized to make it easy for your customers to identify each menu item and digest the information. Most menu boards follow a grid system that clearly separates each item from the rest, creating a clear categorization of products.
Add Color
The color of your menu board’s design can make or break how effective and attractive it is. While this is an important factor, there’s really no one-size-fits-all palette to abide by. To choose the right colors, consider your branding and restaurant decor.
A dark interior, for example, can work well with a white background on the screen, creating a contrast that catches the viewer’s eye — the same with a dark screen against a white or neutral wall.
While your color choice will greatly depend on your restaurant interior, it’s good practice to stick with three primary colors to reduce distraction. Also, make sure you still prioritize readability while getting creative with your color palette.
Choose the Right Font
There are three important things to remember when selecting your text font. First, make sure it’s readable. Second, take inspiration from your brand guidelines. And third, use font sizes to delineate headlines and item text.
Let’s talk about font readability first. Generally, you should stay away from fancy font types that will take your reader longer than a second to read. Opt for plain, legible fonts that don’t strain the eyes and leave no doubt as to what letter or number is on the screen — san serif fonts serve this purpose well.
While your brand guidelines can inspire your font choice, be careful about using fonts with bright colors. Aim for a nice contrast between your text and background to ensure readability. As much as possible, avoid multiple fonts that can make your display look messy – stay consistent!
Last but not least is font size. Your text should be large enough for your viewer to read, even if they are far away from the screen. Use at least two font sizes: a larger one for headlines and a smaller one for the text.
Use Realistic Images
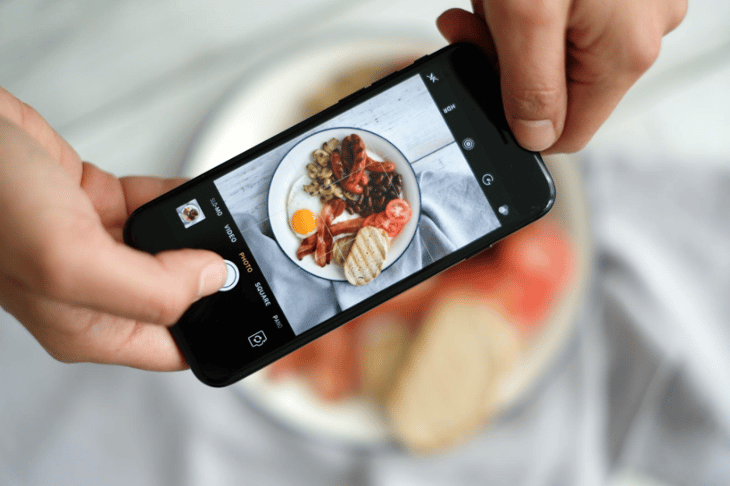
There are plenty of food photos on online royalty-free sites. But it’s not really recommended to use them, especially for restaurants whose main selling point is their food. Stock photos don’t do your dishes any justice, nor will they show how the actual presentation is going to look.
Your images should set expectations and entice your customers to try the dish out. So take your own photos of the food and drinks that you serve — and remember to use the best photography practices to yield attractive and high-quality images.
Create Breathing Space
You might be tempted to crowd your display with plenty of images and text to showcase all your menu items. But don’t overdo it! Make sure to give your menu some breathing space so you don’t overwhelm your customers.
If you have multiple menu items and can’t fit them in a single display, consider using menu slides or better yet, invest in multi-screen digital signage.
Incorporate Movement
Static digital menu boards are a huge step forward from a printed menu. But you can elevate your display even further by adding movement. Swap out a couple of images for videos that increase the appeal of your food. Maybe a juicy cheeseburger that shows the oil dripping from the patty or a hot broth that shows the smoke rising from the bowl.
Add a Call to Action
Your digital menu board is primarily made to be informative with a little promo going on on the sidelines as you showcase your products or offer deals and discounts. You can make it more of a selling machine by adding a call to action (CTA).
It can be as simple as encouraging your customers to ask about your specials or inviting them to visit your website or follow you on social media. QR codes can be useful for this purpose. You can even go as far as running competitions or activities that your customers can participate in to get discounts or vouchers.
Consider Interactive Menu Boards

Digital menu boards aren’t limited to large-scale displays atop your counter. You can have smaller, more interactive installations in strategic areas of your establishment. Interactive menu boards are primarily used to facilitate self-service.
You can set them up to allow customers to place their orders on the screen, or click on different elements to learn more about your products. There are even interactive solutions that allow customers to pay with their cards on the display itself.
Interactive menu boards can help your customers navigate their way around your restaurant without speaking to the staff or waiting in line. They can pave their own journeys and make the experience as seamless as they want it to be.
Interested in creating your own digital menu board? Sign up for our free digital signage solutions.
More From Our Blog
-
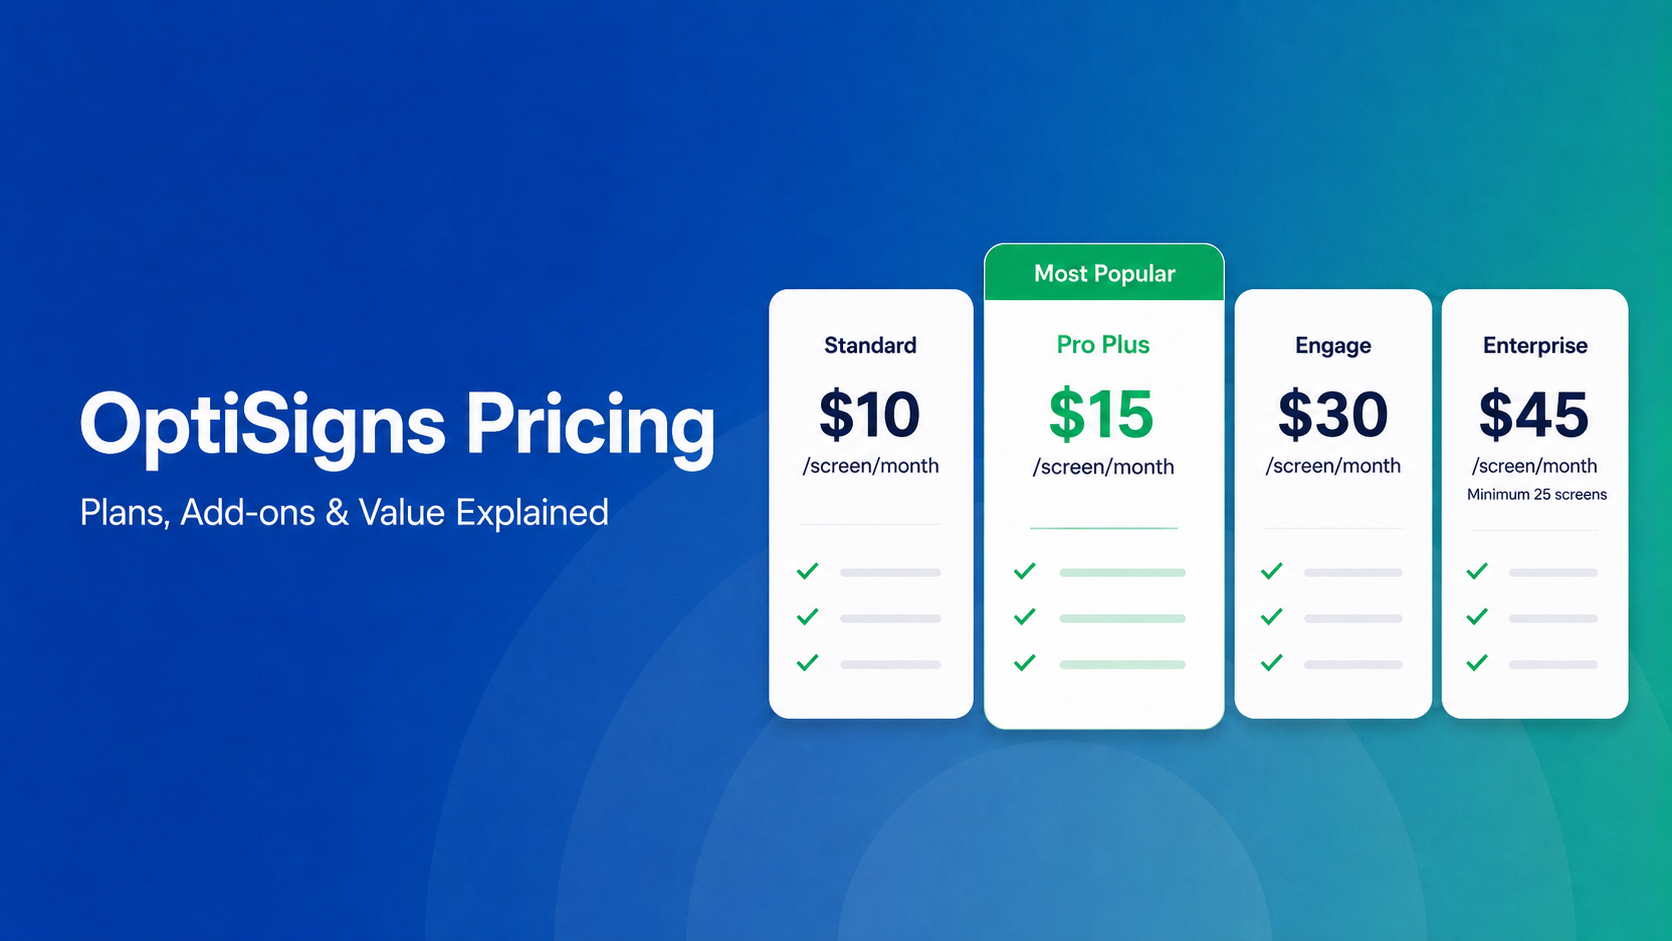
OptiSigns Pricing in 2026: Plans, Add-Ons, and What It Really Costs
OptiSigns' paid plans run $10–$45/screen/month ($9–$40.50 on annual billing). Add-ons for wireless presentation and video walls aren't included in any base plan, and phone support requires an upgrade[…]
Read More -
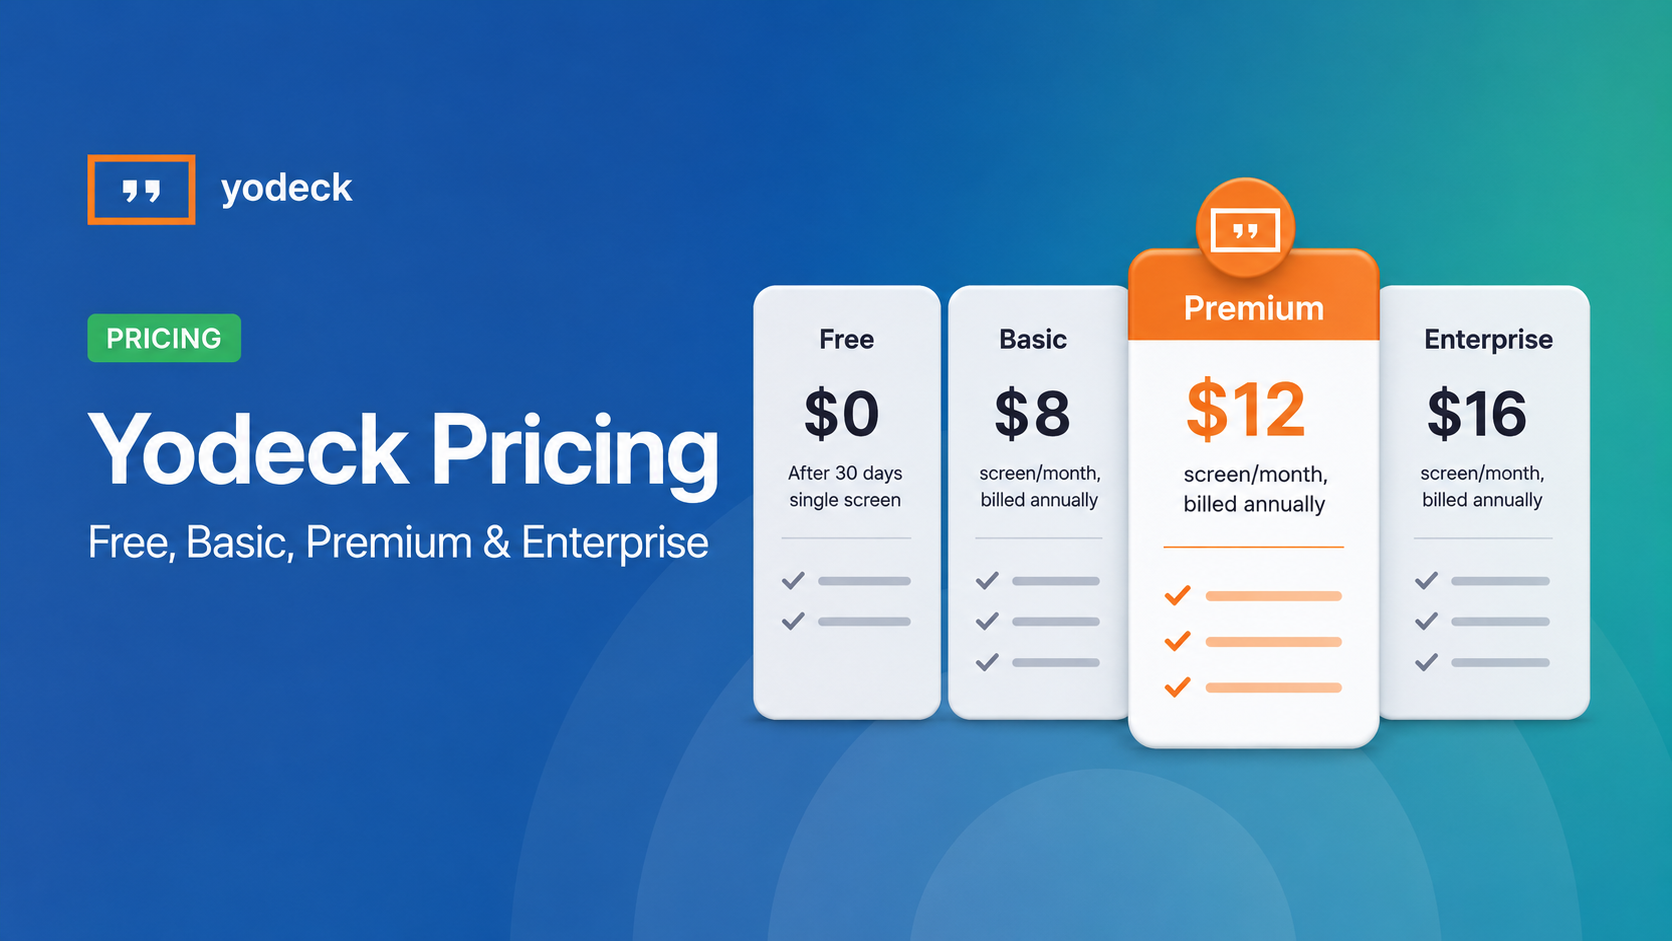
Yodeck Pricing: Plans, Costs & What Changed in 2026
Yodeck bills per-screen with no ceiling (free up to $16/screen/mo) so costs rise with every display added. 2026 Price Increase: Yodeck raised Premium and Enterprise plans by $1/month per screen,[…]
Read More -

The COPS School Violence Prevention Program: A K-12 District's Guide to Federal Funding to Support Student Safety
Every year, school districts are asked to do more with less: keep students safe, keep communication clear, and keep budgets in check, often all at once. The School Violence Prevention Program (SVPP)[…]
Read More
12,300+ Organizations Trust Rise Vision, You Can Too


Schedule a Free Demo
You deserve the #1 all-in-one platform for digital signage, screen sharing, and emergency alerts.


