
PowerPoint used to be the king of the presentation world. Google changed all of this when they announced their presentation tool called Slides, which, in addition to being entirely cloud-based also is free.
Slides has evolved a lot over the years, but there’s still a lot many users don’t know. Below are over 20 Slide features that every teacher and student should know about:
1. Create a Master slide
If you are working on a slide with several people then you are bound to have people using their own colors / fonts / themes. With Google’s Master slide feature, you can design one style that stays consistent throughout the presentation to make sure your presentation stays uniformed. To use this feature, click on “Slide” from the top menu, and then click “Edit master.”

You will now see a master layout; any style you put in the first slide will repeat in any additional slides. You can also add images (such as logos) to this slide, so you don’t have to insert them into each slide.

2. Add a theme to Master slide
Another way to change the Master slide is to go to any text or image in any of your slides, and right-click, then select “Add to them” and click “Master.” This will apply the style of the text or the placement of the image to every slide in the document.

3. Create a Template to Share
Once you have a Master slide, you can use your presentation to share with others in your organization. To add it as a shared template, go to your Google Drive and select the arrow to the right of Google Slides, then select “From a template.”
From here, select “Submit template.”

Finally, go through your presentations and add the one you want to submit.

4. Linked Slides
You probably already know you can copy and paste entire slides; a commonly overlooked feature is linking slides from another presentation; copying and pasting a slide from another presentation is helpful, but if that slide gets changed, it’s not updated in your presentation. Linking the slide ensures that any changes carry over to your presentation. To take advantage of this feature, do copy and paste as you normally would, but when you paste the slide, select “Link slides” from the option box that comes up.

5. Import Slides
Importing a PowerPoint presentation to Slides is easy. Select “File” and “Import slides,” and then click the “Upload” tab.

6. Import Keynote
Importing slides is great if you have PowerPoint, but how do you import Keynote or other presentation software? The easiest way is to save your Keynote presentation as a PowerPoint presentation, and then import that presentation.
7. Insert videos
You can insert YouTube videos and video files right into your Presentation. If you’re doing a live stream on your digital signage, then this is a feature you definitely want to take advantage of. To add a video, go to “Insert” in the top menu and “Video.”

8. Trim a video length
Slides is not a video editing suite by any stretch, but there is one very useful feature for editing a video: trimming a video’s length. This can be helpful if a colleague gives you a ten-minute video, but there’s just a short clip that you want to use in your presentation. To edit a videos link, right-click the video thumbnail image, and select “Video options.”

From here, a new menu will come up with a few options. To trim the video, add the start and end time that you want to use, and then close the box. There is no Save button; it’s automatically saved.

9. Autoplay videos
Trimming a video is great, but if you are using Slides for your digital signage, then you’ll want to be able to start a video automatically. To do this, follow the same steps above (right-click the video, select “Video options”); when the menu appears, select “Autoplay when presenting.”

10. Autoplay slide
Having a video play automatically is useful, but if you are using Slides for digital signage, then you’ll need the slides to automatically advance as well. This is easy to do. When you publish your presentation to the web (from the top menu “File” and “Publish to the web”), there’s an option to Auto-advance slides; change it to your desired time right before you publish the presentation (hint: you can change this later).

11. Host a Q&A
An easy way to encourage feedback from people back is to host a Q&A. As an example, you could have a digital sign that asks passerby’s trivia, and then have a link to where they can give their answer. You can enable Q&A by going into Present mode; from your top menu, select “View” and “Present.”

From Present mode, select the “Q & A” button; if this menu is hidden, just move your mouse.
![]()
Next, click the “Start new” button; if you are returning to the Q&A after you’ve turned it on, this button will change to “Continue.”

The link for the Q&A will appear; copy that so you can display it on your presentation later. If you no longer want to accept questions, just toggle On to Off.

When a user goes to the Q&A, it will look like the below (tip: this is unmoderated; this means there is nothing to stop someone from anonymously posting whatever they want; if this is a feature you want to use, you’ll want to police it often).

12. Link Google Sheets
Just as you can link to other Presentations, you can also link to other Google Sheets. This is a powerful feature if you are displaying Charts or Tables on your digital signage that are regularly updated with new content. Pasting in a Sheet is similar to pasting in a slide. right-click on the slide and select “Paste” then in the option menu, select “Link to spreadsheet.”

To link to a chart, go to the top menu and select Insert > Chart > From sheets.

13. Use drop shadow / reflection
Using bold is an easy way to make text stand out in a document, but if you want it to stand out in a Presentation, then drop shadow or adding a reflection is often a better solution. To add this formatting, go to the formatting bar; at the far right side of this bar, there is three dots (which represents more options); click those three dots, and then from the new menu, select “Format options.”

This will bring up a formatting box; drop shadow and reflection are both options; clicking the arrow to the left side of them will expand the options. After you make your select, you do not need to save. Save is automatic.

14. Word art
Another way to make your text stand out is to turn text into Word art. You can do this by click “Insert” on the top menu, then selecting “Word art.” From here, add the text you want, and then press Enter on the keyboard. You can edit the font / colors / size of the Word art the same way you would normal text.

15. Use Image Masking
Google Slides does not have a lot of photo editing options, but one that is very helpful is the Mask tool; this tool lets you change any image into a shape (such as a heart or lightning bolt). To use this tool, click the arrow next to the Crop button in the formatting menu, and then select the Shape that you want to use.

16. Undo all changes
If you are working with several people on a Presentation, version history is important; with Slides you can easily undo all changes a person made. To do this, go to File > Version history > See version history.

This will bring up a Version history menu; from here you can look through all changes and revert back to the one you want to go back to.

17. Create a shared folder
If you are working with others, having one folder that everyone shares from in Google will help you stay organized. From here, you can easily add both images and docs that you are using in a Presentation. To do this, go to your Google Drive and right-click on the folder you want to share, then select “Share.” If there are people outside your organization (i.e. with a different email extension), then you’ll want to make sure you share it with anyone with a link.

18. Skip and sync slides
If you don’t want to have several Presentations for different seasons, or if you reuse the Presentation, but don’t always cover the same topics, then the Skip slide feature is useful. With Skip slide, you could, for example, have a Presentation for your digital signage with all school holidays; you could have it skipping all slides not related to the current holiday. To use this feature, click on “Slide” on the top menu, and then “Skip slide.”

19. Google Keep
Windows has Notepad; iPhone has Notes; Google has Keep. Keep was introduced in 2013 as a simple way to keep track of ideas. In Slides it’s an easy way to jot notes of things you are thinking about but may not include in a presentation--such as a chart or infographic you just want to reference back to. Keep has a native iPhone and Android app and they can sync seamlessly to any Presentation. To use it, go to “Tools” in the top menu, and “Keep notepad.”

20. Use an add-on
Don’t rely on Google for all of your features; on the top menu, there’s an option for “Add-ons.” Add-ons are both free and paid, and give you access to hundreds of tools just for slides--from importing charts to using stock photos.

21. Export your presentation
Google Slides lives in the cloud, but you can still download and even export your presentations. To do this go to “File” from the top menu, and select “Download as”; from here, you’ll have several different options.

22. Edit your presentation without a computer
Most people who use Google Slides use it on their computer; Slides is available on almost every phone and tablet as a native app. Using the native apps syncs with what you have already created, so if you change on your phone, you’ll see it on your computer.
Now that you are up-to-speed on Slide features, create a free Rise Vision and use Slides with your digital signage. Not sure why your school would need digital signage? Check out our post on 50+ things a school can do with it. You can also check out our school digital signage best practice post.

More From Our Blog
-
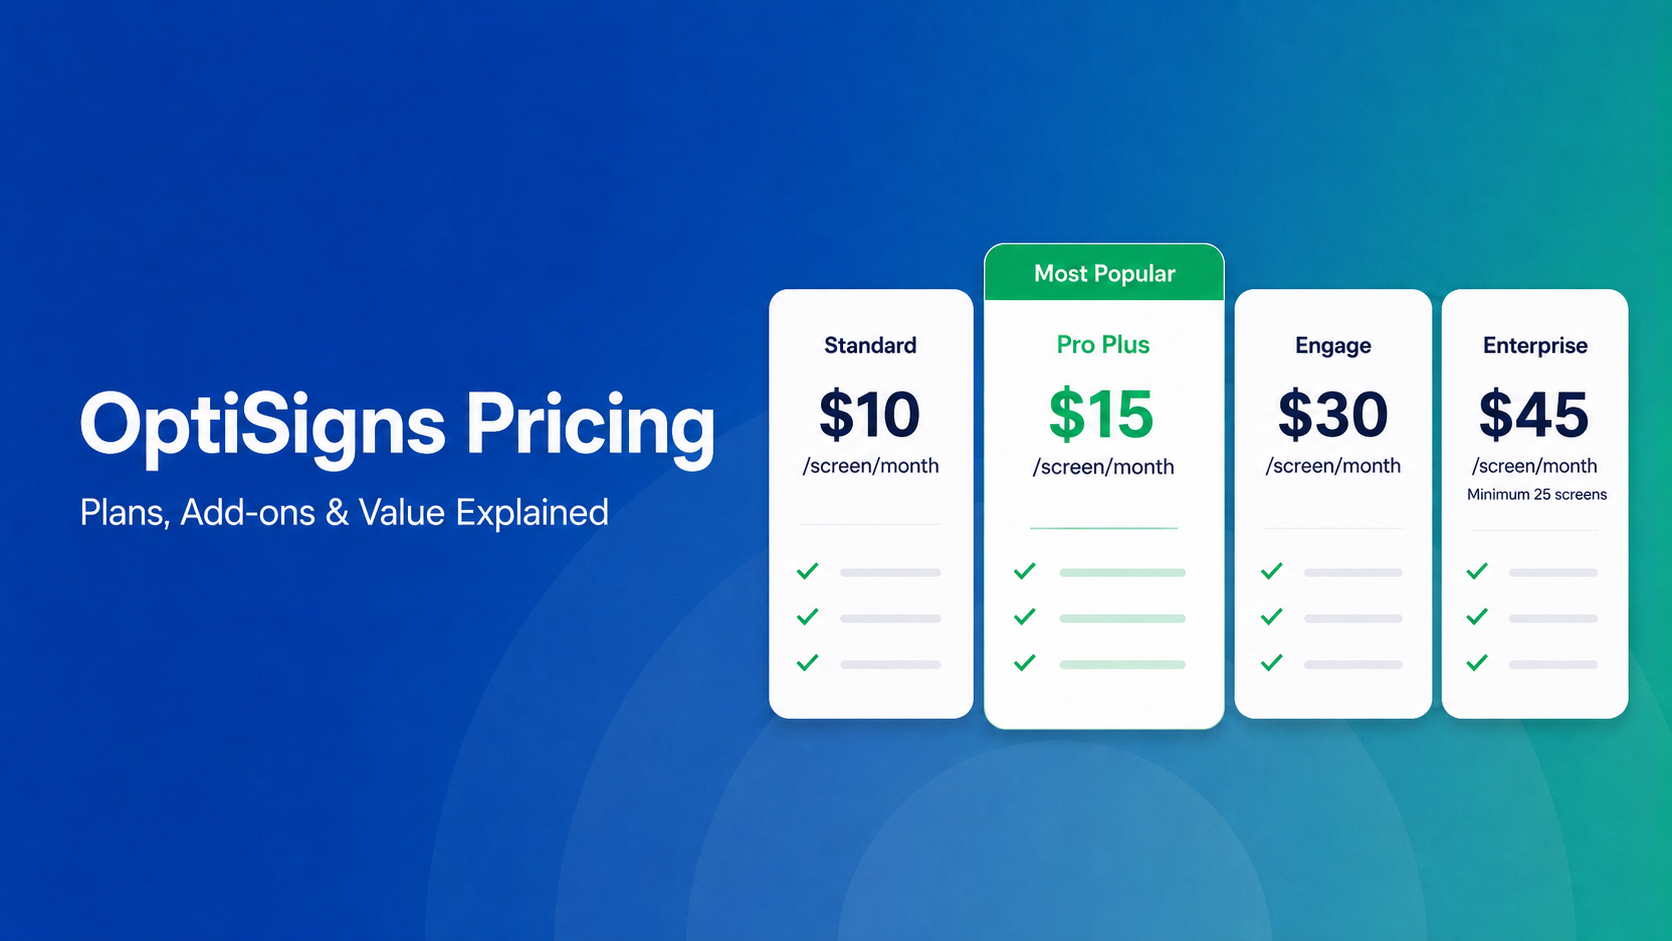
OptiSigns Pricing in 2026: Plans, Add-Ons, and What It Really Costs
OptiSigns' paid plans run $10–$45/screen/month ($9–$40.50 on annual billing). Add-ons for wireless presentation and video walls aren't included in any base plan, and phone support requires an upgrade[…]
Read More -
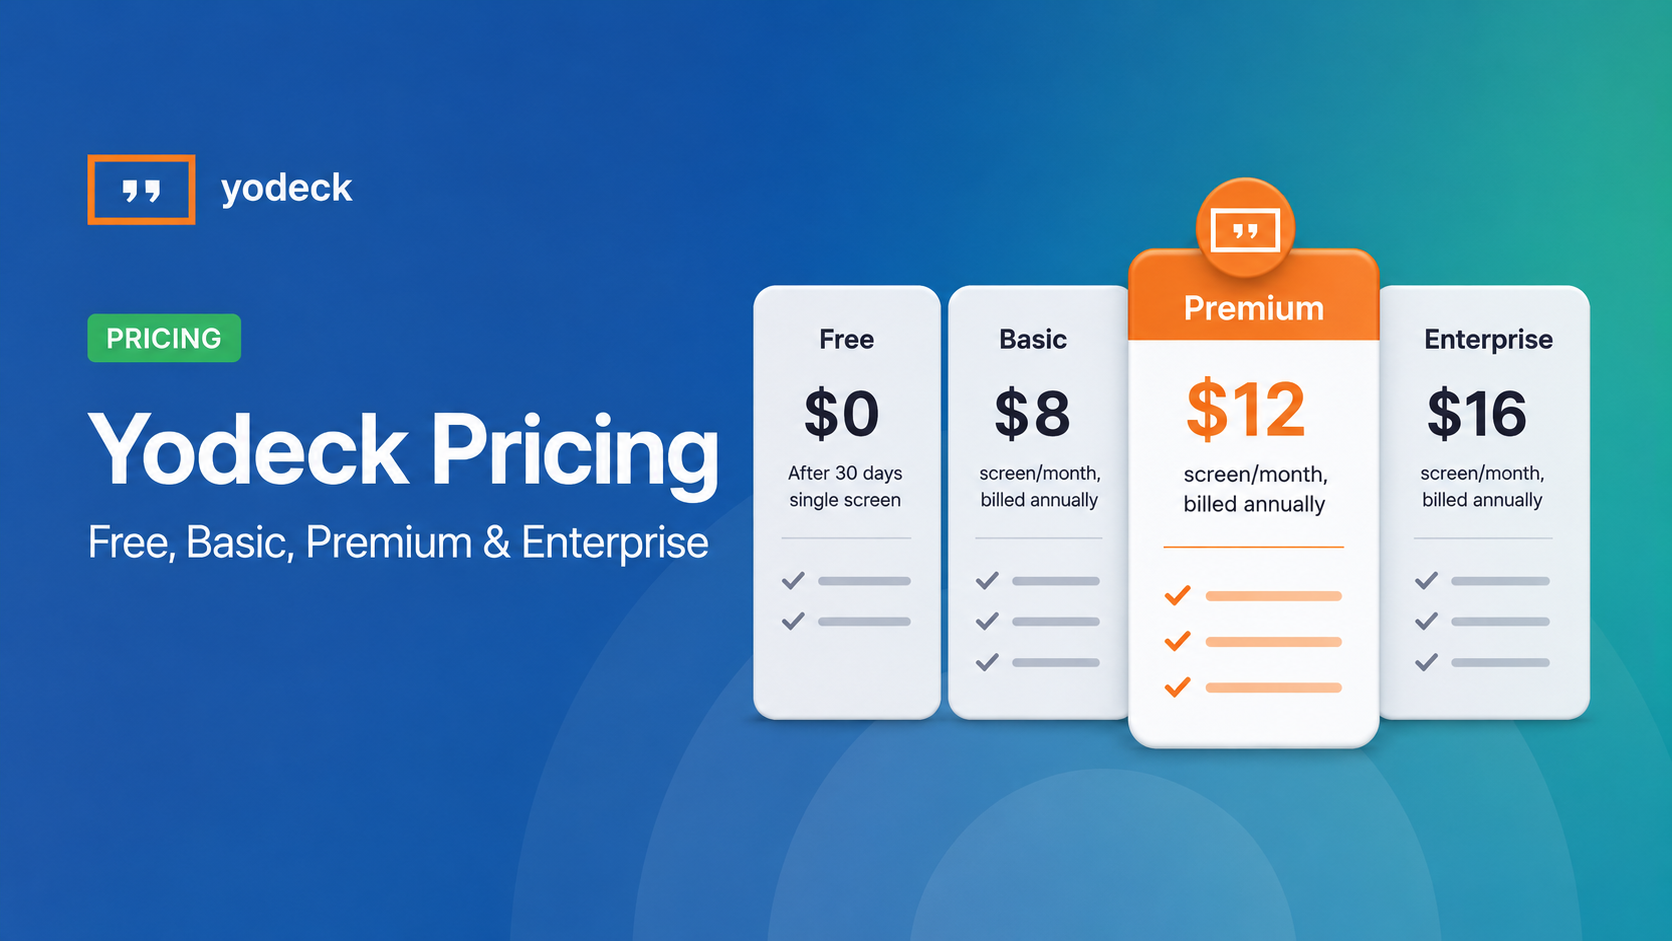
Yodeck Pricing: Plans, Costs & What Changed in 2026
Yodeck bills per-screen with no ceiling (free up to $16/screen/mo) so costs rise with every display added. 2026 Price Increase: Yodeck raised Premium and Enterprise plans by $1/month per screen,[…]
Read More -
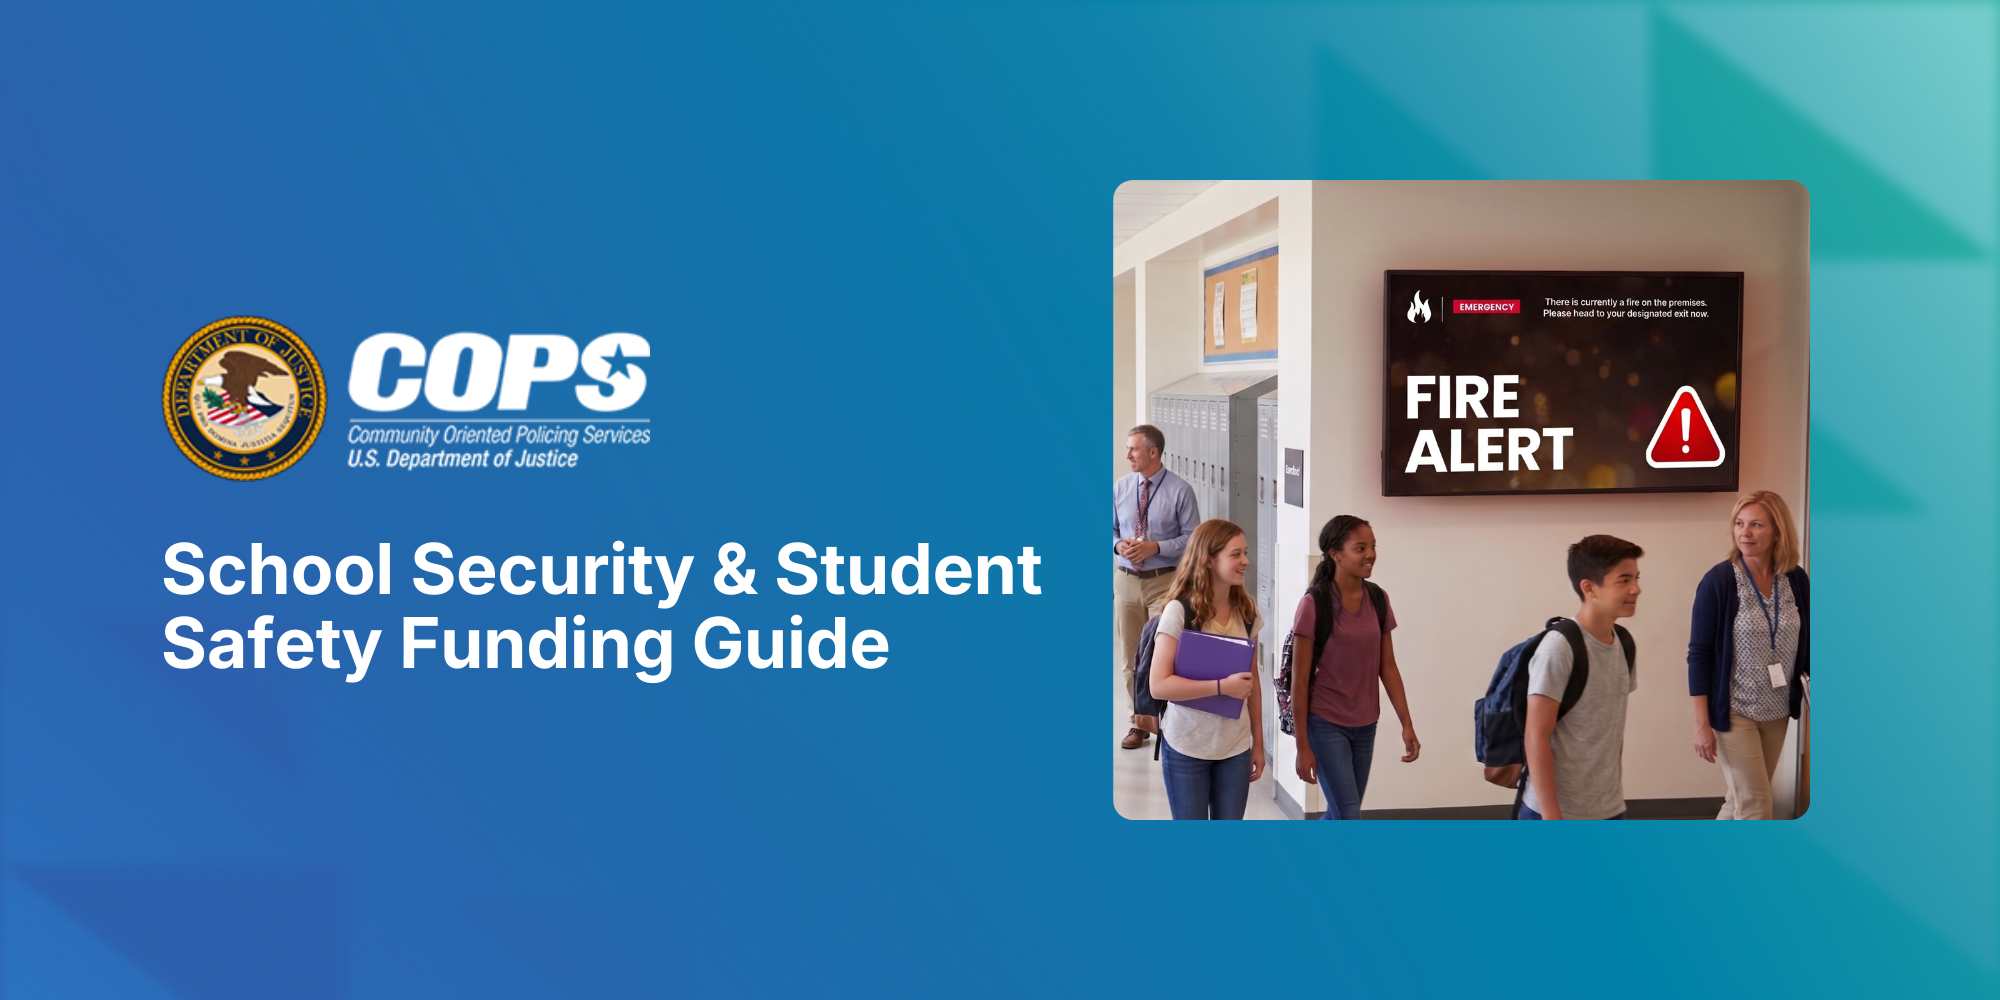
The COPS School Violence Prevention Program: A K-12 District's Guide to Federal Funding to Support Student Safety
Every year, school districts are asked to do more with less: keep students safe, keep communication clear, and keep budgets in check, often all at once. The School Violence Prevention Program (SVPP)[…]
Read More
12,300+ Organizations Trust Rise Vision, You Can Too


Schedule a Free Demo
You deserve the #1 all-in-one platform for digital signage, screen sharing, and emergency alerts.


